Showing posts with label chocolate. Show all posts

Thursday, September 11, 2014

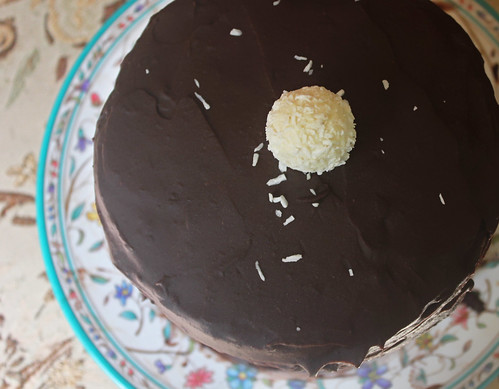
Chocolate Fudge Cake with Salted Caramel Buttercream And Dark Chocolate Fudge Frosting

Chocolate Cake with Salted Caramel Buttercream

Here I am, up at 1 am, surrounded by not one, not two, but FOUR different types of cookies around me! Yes!!! I have finally taken this seriously & I'm testing recipes every spare minute I can find, which with work, gym & a social life is almost impossible! So it's the sleep that's getting sacrificed, and honestly, I'm loving every minute of it. Being so busy that you end up collapsing in bed is my form of bliss!

After spending the last two hours researching the ratios & hows & whys of chewy caramel (to use in caramel stuffed cookies), I finally remembered this post that has been pending for 4+ months! I made this cake in one of my random bursts of inspiration & craving. The recipe was actually bookmarked long ago, and my team at work was constantly asking for something after discovering the blog, which is actually kept quite a secret because the follow up question is always - WHY DON'T YOU BAKE ANYMORE??
Chocolate Cake with Salted Caramel Buttercream

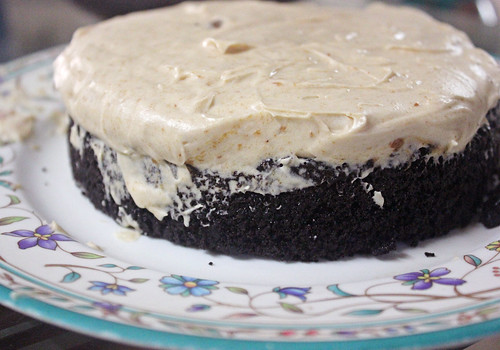
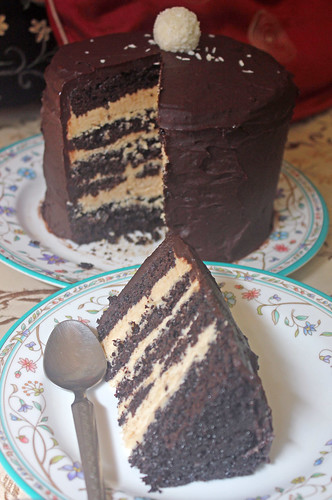
But one day - maybe I was feeling generous - I decided to do as they wanted & make an indulgent, rich & sinful cake. This cake just went on to prove how much I actually love just stepping into a kitchen & coming out with a delicious plate of trouble in a few hours. I don't know which was more fun, the cake making process, or the happiness when I saw the smiles on the people who ate it, or the taste of the cake itself! The cake is light yet full of chocolatey goodness, and the salted caramel buttercream is something you'd want to take a long bath in, it's that rich while still tasting smooth and dream like. Top it off with a simple chocolate fudge frosting, and you've got heaven on a plate, just like that!
Chocolate Cake with Salted Caramel Buttercream

Chocolate Fudge Cake with Salted Caramel Buttercream
Recipe from Martha Stewart via Sweetapolita
Yield: Three 6-inch round layers
Serves: 8+

Ingredients
1 1/2 cups (180 g) all-purpose flour
1 1/2 cups (300 g) sugar
3/4 cup (90 g) dark unsweetened cocoa powder
1 1/2 tsp baking soda
1 tsp baking powder
1 tsp salt
1/4 cup (60 ml) vegetable oil
3/4 cup (190 ml) buttermilk
3/4 cup (190 ml) hot brewed coffee
2 eggs, room temperature, lightly beaten
2 tsp vanilla

Instructions:
  1. Preheat oven to 350° F (180°C). Grease & line three 6-inch round cake pans with parchment paper.
  2. In the large bowl of your electric mixer, sift together all the dry ingredients. Add all the remaining ingredients and beat until just mixed. The batter will be quite liquidy.
  3. Pour into prepared pans and bake for 30 minutes, until a skewer inserted comes out clean and the top feels springy to the touch
  4. Cool to room temperature on wire racks. Refrigerate until ready to assemble.
For the Salted Caramel Swiss Buttercream filling
Yield: 4 cups - You may be leftover with approximately 1/2 cup

Ingredients
1 cup (200 g) sugar
1/4 cup (60 ml) water
1/4 cup (60 ml) heavy cream
generous pinch of sea salt
1 1/2 cups (3 sticks / 340 g / 12 oz) unsalted butter, at room temperature
4 large egg white
1 tsp pure vanilla extract

Instructions:
  1. First, we have to make the salted caramel to cool and keep aside, ready to add into the buttercream
  2. In a medium saucepan, mix together 1/2 cup + 2 tbsp (130 g) of the sugar with the water. Boil over medium heat. Brush down the sides of the saucepan with a dampened pastry brush to prevent crystallization. Don't stir the mixture at all from now on, you can however, gently swirl, occasionally.
  3. Remove from heat and carefully add the cream, whisking until smooth. Be careful of the sputtering. Whisk in the sea salt & vanilla, set aside to cool.
  4. Now it's time to make the buttercream. In the large bowl of your mixer, beat cubes of the butter until pale & fluffy, about 3-5 minutes.
  5. In a clean bowl, combine the egg whites & sugar. Place bowl over simmering water, whisking occasionally until the sugar dissolves, reaches 160° on a candy thermometer and the mixture doesn't feel gritty when rubbed between two fingers.
  6. Remove the bowl from the heat and whisk on medium speed for about 5 minutes. Increase the speed and whisk until stiff peaks form, about 5-6 minutes. The bowl should now be at room temperature. Reduce the speed to medium-low, and add in the beaten butter, one cup at a time, whisking between each addition.
  7. Using the flat beater, add the cooled caramel, beating until smooth, about 3-5 minutes.
  8. Your buttercream is ready :) Store in the fridge until ready to use.

For the Dark Chocolate Fudge Frosting
Yield: ~5 cups - You will be leftover with approximately 1.5 cups

Ingredients
1/4 cup + 2 tbsp (45 g) unsweetened Dutch-process cocoa powder
1/4 cup + 2 tbsp (90 ml) boiling water
1 1/2 cups (3 sticks / 339 g /12 oz) unsalted butter, room temperature
1/2 cup (63 g) confectioners’ sugar
pinch of salt
1 pound (454 g/16 oz) good-quality semi-sweet chocolate, melted and cooled

Method:
  1. In a small bowl, combine together the cocoa powder & the boiling water, stirring until the cocoa has dissolved
  2. In a large bowl, beat together the butter, sugar & salt using a flat beater, until pale & fluffy - about 5 minutes
  3. Reduce speed to medium-low and add the melted chocolate, beating until combined. Add in the cocoa mixture and beat until well incorporated.

To assemble:
  1. Split the layers into halves. Lay the bottom half of a layer onto a cake plate/board. Lay strips of parchment along the sides of the cake to ensure an easy clean up.
  2. Scoop out about 1/5th of the filling onto the cake layer. Flatten out using an offset spatula. Add another cake layer on top and repeat the process until you have laid out all six layers. Ensure the top layer is the inverted bottom of one of the three cakes, to get a perfectly flat top.
  3. Crumb coat with a light layer of the dark chocolate fudge frosting. Refrigerate.
  4. Now ice the sides & top of the cake with the frosting - an offset spatula, a straight spatula & a bench scraper are your best friends during this, as is a good turntable - I use something similar to this.
  5. Lay on your preferred candy of decoration (I used a Ferrero Raffaello)
  6. Serve at room temperature

Sunday, December 8, 2013

Gooey Chocolate Chip Cookie Dough Bars

Gooey Chocolate Chip Cookie Dough Bars

These bars...

They're just pure sin!

And I polished off more than half a pan myself late one night *embarrassed smile*


So I'm never making them again... especially given that I've just realised I've gained 10 kilos over the last year & need to lose it by the end of January!

Gooey Chocolate Chip Cookie Dough Bars

But you totally should... Just make sure you have lots of people around that you can gift them to, they're not all that fattening if you eat 1-2 bars like any normal human being would, but unfortunately these are the sort that make you want to curl up in your favorite pyjamas, play your favorite movie and munch on till you forget you were ever trying to diet! They've got oats, so they're sorta healthy too!


http://yumsiliciousbakes.blogspot.com/2013/12/gooey-chocolate-chip-cookie-dough-bars.html


Gooey Chocolate Chip Cookie Dough Bars
Adapted from Recipe Girl
Makes one 9x13 pan, or 24 bars


For the Gooey Chocolate filling:
2 cups semi-sweet chocolate chips
One 14-ounce can sweetened condensed milk
2 tsp vanilla extract

For the cookies:
1 cup [2 sticks / 226 g] unsalted butter, at room temperature
1 cup light brown sugar
1/2 cup [100 g] granulated white sugar
1 large egg
1 large egg yolk
1 tbsp vanilla extract
2 cups [240 g] all-purpose flour
1 cup quick-cooking or old-fashioned rolled oats
1 tsp baking powder
1 tsp baking soda
1 tsp salt - omit if using salted butter
2 cups semi-sweet chocolate chips

Instructions:
  1. Preheat oven to 350 F [180 C]. Grease and line a 9x13 pan with parchment paper or strong foil, leaving enough overhang to lift the bars out of the pan.
  2. For the gooey chocolate filling: In a small saucepan over extreme low heat, melt together the chocolate chips & condensed milk, stirring constantly, until the chocolate has melted. Take the pan off the heat, stir in the vanilla and set aside to cool.
  3. For the cookie: In the bowl of your mixer, beat the butter and sugars together until light and creamy. Beat in the egg, egg yolk & vanilla.
  4. In a medium bowl, whisk together the flour, oats, baking powder, baking soda and salt (if using). Add this to the butter mixture, beating just until incorporated. Stir in the chocolate chips.
  5. Divide the dough into two halves. Use one half and press down lightly in the bottom of the pan until it's more or less an even layer. Now pour the cooled chocolate mixture on top, spreading to create an even layer.
  6. Add dollops of the remaining dough on top of the chocolate layer, it's ok if it doesn't cover it completely, I chose to have quite a bit of the chocolate layer peeking through.
  7. Bake 20-25 minutes until golden brown. Cool completely, then cut into bars (refrigerating these bars for half an hour just before cutting will give you neater bars, allow to come back to room temperature before serving)

Sunday, October 13, 2013

Chocolate Truffle Tart

Chocolate Truffle Tart

What do you when craving strikes? A craving so bad that a piece of your favorite chocolate bar, brownies that you love munching on day or night, or even the mud cake from your favorite restaurant in the city won't do? And even better, what do you do when this craving strikes at 2 am on a working night, with a persistence that you know won't subside?

If you're me, you make this tart that you'd bookmarked a while away but never gotten around to making. It's perfect because it's quick, and no weird ingredients, just the pantry basics. With a nice dollop of ice cream, in less than an hour you're golden, with the intense craving fulfilled and a euphoric feeling about you.

Chocolate Truffle Tart

The original recipe from Gourmet uses chocolate Nabisco wafers for the crust, which aren't available here. I've seen some variations of it with a normal pâte sucrée, but since I was trying to satisfy a mean craving, I went with a gorgeous chocolate tart dough by Johnny Iuzzini. And what a great decision that was...the biscuity tart base went perfectly with the rich, dense chocolate filling, highlighting the richness of the filling even more and yet standing out by itself as a great dessert. And the best bit? No pastry cutter, keeping the butter cold, oh so delicate touch needed, I made this in my KA!

Chocolate Truffle Tart

Chocolate Truffle Tart

For the Chocolate Tart Dough
Recipe from Dessert FourPlay by Johnny Iuzzini [India | USA | UK]

10 tbsp [114 g] cold unsalted butter, cut into pieces
3/4 cup sugar
1 tsp salt [omit if using salted butter]
1 large egg
1 large egg white
2 1/2 cups [300 g] all-purpose flour
1/2 cup [40 g] unsweetened cocoa powder
1 tsp baking powder

For the chocolate filling:
Adapted from Gourmet.com
1/2 lb [8 oz] fine-quality bittersweet chocolate (no more than 60% cacao if marked), coarsely chopped
3/4 stick [6 tbsp / 90 g] unsalted butter, cut into 1/2-inch cubes
2 large eggs, lightly beaten
1/3 cup heavy cream
1/4 cup [50 g] granulated sugar
1/4 teaspoon salt
1 tsp vanilla extract

Equipment needed:
9 inch springform pan or an 8 inch tart pan & two 4 inch tart pans

Instructions-
  1.  For the chocolate tart dough: In a large bowl, cream together the butter and sugar until soft. Add the salt [if using], the egg and the egg white, beating between each addition.
  2. In a separate bowl, sift together the flour, cocoa powder and baking powder. Add this to the butter mixture, and beat till it comes together.
  3. Shape into a round disc, wrap in cling film and refrigerate for half hour.
  4. Preheat oven to 375 F [190 C], and roll dough out after refrigeration [I always roll out between sheets of parchment / cling film]. Line the tart pans of your choice, then put a layer of parchment, and fill with pie weights or coins. Bake for 20 minutes.
  5. For the chocolate truffle filling: Melt the chocolate and butter together over low heat. Cool to room temperature
  6. Add the eggs, the heavy cream, sugar, salt and vanilla extract. Pour into baked chocolate tart shells and bake for 20 minutes, until filling is just slightly jiggly in the center.
  7. Serve warm with a dollop of ice cream

Saturday, July 13, 2013

Chocolate Marble Bundt Cake

IMG_2024

4 months since the last post on this... 4 (or a little less) months since life has taken a full turn, and everything I knew to be normal changed.

No.. there's no death, there's no life-threatening illnesses that happened. Just a lot of drama, a lot of confusion, and a lot of re-thinking of life. Which is why I've been away from the blog so much.. I've just lost all motivation. I didn't even know Google Reader had shut down!

I logged on last week because I finally managed some time.. and saw that I couldn't read any of my blogs anymore. I've begun using Feedly for now, what are you guys using?

Anyway... on to the cake. Over a year ago, I'd excitedly ordered this bundt pan, and got a friend to lug it over for me, since finding one in India at that time was next to impossible. And then I used it once, it's been sitting on my table ever since.. I kept it there as a reminder to use it. After seeing it everyday and not using it, finally a day after my birthday, I picked it up and went in to the kitchen. Figured baking would be my birthday gift to myself.

And I realised.. I'd forgotten how much I absolutely love baking. What a stress buster it is. How calming the measuring and scooping out of ingredients could be.. how therapeutic watching the mixer turn regular ingredients into gorgeous batter could be, and how enjoyable the sense of letting go and relying on the oven was. The anticipation of watching the oven work its magic and turn regular batter into a thing of joy was the perfect birthday gift.

As was this cake. It's the perfect coffee cake, it's light yet rich, and not sickeningly sweet. I forgot to marble the cake, and instead just ended up layering it, but it was just an aesthical flaw. I found the recipe over at Food Librarian, whose I Like Big Bundts activity is the first thing that shows when you look for bundts. When I clicked over and saw that the recipe is from my favorite book, Baked , I was sold!

Make this cake now. It's a crowd pleaser! Also, please do tell me how you guys are managing without Reader, is Feedly really the best option?


IMG_2019

Marble Bundt Cake
Adapted from Baked: New Frontiers in Baking

Chocolate Swirl
6 ounces dark chocolate, coarsely chopped
1 tsp unsweetened dark cocoa powder

Sour Cream Cake
1 cup [2 sticks/226 g] unsalted butter, at room temperature
2 1/4 cups [450 g] sugar
4 large eggs
16 ounces sour cream - I used homemade sour cream, so the weight will vary
1 1/2 tsp vanilla extract
3 1/2 cups [420 g] all-purpose flour
1 1/2 tsp baking powder
1 1/2 tsp baking soda
1/2 tsp salt - omit if using salted butter

Instructions -
  1. Preheat oven to 350 F (180 C). Grease and flour a 10 cup bundt pan (Mine's a 12 cup).
  2.  Chocolate Swirl - In a medium saucepan, melt together the chocolate and cocoa on extremely low heat, stirring constantly. Set aside to cool to room temperature.
  3. Sour Cream Cake - In the bowl of your mixer, cream together the butter and sugar until light and fluffy. Scrape down, then add the eggs one at a time, beating between each addition. Now stir in the sour cream and vanilla, and mix till incorporated
  4. In a large bowl, sift together the flour, baking powder, baking soda & salt (if using). Add this into the butter mixture in three additions, mixing just till incorporated between each addition, do not overmix.
  5. Scoop 1/3 of the ready batter (approximate is fine) into the chocolate mixture, and stir until evenly mixed.
  6. Pour half of the remaining batter into the bundt pan, and level with a spatula. Scoop the chocolate batter on top of this in dollops, it's ok if some of the white batter peeks through. Using a knife, swirl through the batter. Now pour the remaining batter on top, and swirl with a knife again.
  7. Bake for about 1 hour, or until a knife inserted comes out clean. You might need to tent the top with a foil if you feel it's getting too brown.
  8. Cool to room temperature and remove from pan. Serves 6-8.

Monday, January 21, 2013

Chocolate Espresso Biscotti

Chocolate Espresso Biscotti

Finally. I stepped back into the kitchen after almost 2 whole months. I'd been on this serious dieting = working out bender, to lose the extra pounds, and an added motivation was my sister's wedding, which just about finished. I've taken a week or so off from the gym+diet, so ofcourse the first thing I wanted to do was eat something chocolatey.

When you're craving something bad, deciding what to make is quite a task. Luckily, it was a made a little easier because I had to bake something for this month's Secret Recipe Club. I had Veronica's blog, My Catholic Kitchen as this month's assignment. Going through this blog was super fun, and one of the few where I had tons and tons of options. Since I was craving a fix bad, I picked the one whose ingredients were already at home. Biscotti has also been something I've always meant to try making, but never really gotten around to.

Chocolate Espresso Biscotti

It was surprisingly easy to make too. About 10 minutes of prep and they were in the oven. Biscotti translates to 'twice baked', and the waiting period between the two baking bursts were the hardest part. I actually contemplated leaving one of the logs as is, and eating it like a giant cookie. But I was good, and I baked both the way they're supposed to be baked. These are so crunchy and light, they're the perfect start to my mornings. And, they're not even that unhealthy :)
Chocolate Espresso Biscotti
  
 Chocolate Espresso Biscotti
Adapted from My Catholic Kitchen

1/3 cup butter, softened
2/3 cup white sugar
2 eggs
2 tsp espresso coffee
1/4 cup cocoa powder
2 tsp baking powder
2 cups all purpose flour
1/2 cup mini chocolate chips

Instructions -
  1. Preheat oven to 350 F. Line a cookie sheet with parchment.
  2. In the bowl of your mixer, beat the softened butter until creamy. Add the sugar, and beat until light and fluffy. Now add the eggs, one at a time, beating between each addition. Also mix in the espresso.
  3. Sift together the cocoa powder, baking powder and flour. Add to the previous mixture, it will be very thick. Mix in the chocolate chips.
  4. Divide the dough into two parts, and shape them into flat logs, about 2-3 inches thick. Bake for 30 minutes, until the top feels done.
  5. Remove from oven and cool for an hour on a wire rack. Now slice the logs diagonally, about an inch thick. Line the bars up on the cookie sheet. Bake for another 10 minutes, or until the biscotti are crisp.
  6. Munch on with a cup of steaming coffee :)

Monday, November 19, 2012

DIY : Homemade Whatchamacallit Bars

Homemade Whatchamacallit Bars
(Update Dec 2012: Picture of a new batch)
 (Sorry about the crappy picture, clicked these in the night and finished them, I'll make some more soon and update the post)

Who else loves these bars? They were quite the nostalgic trip for me, I remember eating them as a child, before we moved to India, and absolutely loving them. They still aren't available in India, but I had ordered a box of them while I was in the UK, so up until a few months ago I was happily enjoying them, being reminded of their awesomeness.

Ofcourse, coming here I missed them a lot, but never considered looking up a recipe for a homemade knock-off, even though I have made or seen quite a few other candy bars. Until I got this month's Secret Recipe Club assignment that is. Chris's blog, Mele Cotte, has been on my reader for ages, and all the desserts she posts has made it one of my top blogs. I was super pumped to get her blog this month. I went to her recipe index, totally prepared to spend a day or two trying to decide what to make, as I usually do. And while a lot of recipes stood out to me, as soon as I saw these bars, I was sure. I couldn't believe my eyes, and cursed myself quite a bit when I realised I could have been making these bars for ages.

They are super easy to make, especially if you have butterscotch chips. I didn't, and made my own butterscotch sauce, which took all of 5 minutes and has already become a staple in my house. I want to play with that recipe just a bit more, and I'll post it after I'm done. The most difficult part is waiting for the chocolate to set, and the anticipation of knowing how close they reach to the real deal, which is a LOT. I am in love with these, they are so good, and I know the pan's going to be over in no time. Luckily, its an easy recipe to be addicted to!

Homemade Whatchamacallit Bars
(Update Dec 2012 : Picture of a new batch) Look at that luscious peanut buttery caramel oozing out. There goes the diet.

Homemade Whatchamacallit / Peanut Butter Rice Krispy Caramel Bars
Recipe from Mele Cotte

1 cup light brown sugar
1 cup white corn syrup (I used honey)
1 cup peanut butter
1/3 cup butterscotch chips
6 cups Puffed Rice Cereal (like Rice Krispies) (for Indians, kurmura is about the same thing, though Iused Rice Krispies)
2 cups good-quality bittersweet chocolate

Instructions -
  1. Grease and line a sheet pan. Set aside. Place the Rice Krispies in a large bowl, that allows space for mixing.
  2. In a medium saucepan, mix together the sugar, corn syrup / honey, and peanut butter. Melt, remove from heat and add the butterscotch chips/sauce. Stir until melted completely
  3. Pour this mixture over the Rice Krispies, and stir/toss to coat evenly. Transfer into the prepared pan, and try to form a nice even layer. Refrigerate to set.
  4. Once the Rice Krispies are set (about 10 minutes), cut them into large bars.  Re-line the same pan, or use another large pan lined with foil.
  5. Melt the chocolate in a double boiler / microwave. Using a fork, dip each bar into the chocolate, ensuring it is coated on all sides, and lay onto the prepared foil lined pan. Allow the chocolate to set ; enjoy.

Monday, September 17, 2012

Sunday Night Cake

Sunday Night Cake from Baked

Soo.. Anyone know how to get rid of small moths in the house? Since my room was virtually untouched for 6 months, it had a few moths when I got back, that didn't seem to be going away. I put out some naphthalene balls, and now, I'm super sick, with the parents slightly sick. I think I just had an almost-suicide attempt :P

Anyway.. With the sickness, I've been cooped up at home since a few days. I was of course, craving some dessert, and with Secret recipe club's reveal coming soon, I started to browse through my assignment for the month. I got super lucky this month, because Jamie is a part of Club Baked, which essentially is TWD, except with the Baked series of books, that I absolutely LOVE!. And with their new book Baked Elements recently out, they've taken over my mind even more than usual.

I knew immediately I'd make one from their books, and focused in on the Sunday Night Cake because of ingredient availability at home. It's got a weird name, but apparently it's to indicate that you can whip this up in an instant, for family, on a lazy Sunday. And that is exactly what the cake is. Hearty, comforting, and just perfect. The cake is robust, and has an interesting taste with the cinnamon, very right for fall. And the frosting / pudding is super rich and intense, and gives the perfect balance. As I've said countless times, I'm not a fan of the powdered sugar American buttercream, but this puddingy frosting is perfect. I actually have some leftover and hopefully I should be up to trying it with something else too.

Sunday Night Cake
Recipe from Baked Elementsvia Cookin' with Moxie

1 3/4 cups cake flour - I used the substitute of AP flour + cornflour/cornstarch
2 tsp baking powder
1 tsp salt
1/2 tsp cinnamon (I used almost a whole teaspoon, I love cinnamon a little too much)
1 1/4 stick [5 oz /  140 g] unsalted butter - I used salted just fine, omit the salt of course
3/4 cup [150 g] granulated sugar
1/2 cup [110 g] packed light brown sugar
3 large eggs, at room temperature
1 cup sour cream - I used hung/greek yoghurt

Instructions -
  1.  Preheat oven to 350 F [180 C]. Grease and line a 9 inch square pan. I couldn't find mine, so I used to 6 inch round pans instead.
  2. Sift together flour, baking powder, salt and cinnamon. Set aside.
  3. In the bowl of your mixer, cream together the butter and the sugars till light and fluffy. Add the eggs one a time, beating between each addition.
  4. Alternately add the flour mixture and the sour cream / yoghurt in a dry, wet, dry, wet, dry pattern. Don't over mix.
  5. Pour into prepared pans and bake for 35-40 minutes, until a skewer inserted comes out clean. Cool on wire rack for at least half hour before frosting and serving.


Sunday, September 9, 2012

One Bowl Chocolate Brownies

One Bowl Brownies from Smitten Kitchen

Hello!  I am super pumped today, I am officially done with my course. I handed that horrible pain of a dissertation in 2 days ago [now 5, it took me a while to get to completing this post], and I'm no longer a student! Ofcourse I'm not officially a post-graduate yet, need to wait for the results, but I'm pretty sure I'll make it :)

Even though I've done a ton of decorating classes, and made many layered cakes, somehow when it comes to comfort baking, I always turn to brownies. I'd seen these posted on Smitten Kitchen a few days before I submitted, and it stayed in my mind through it.

The recipe is a breeze to put together, and in half an hour I was munching on brownies :) They're super easy, and taste really fudgy and dense, just how I like it. I am not even ashamed to admit I ate the entire pan, paired with some ice cream or even plain.

I had some unsweetened chocolate in my travel hoard, but for those who don't, Deb has provided an alternate. Unsweetened chocolate manages to pack a punch in the small amount used though, so I'd probably suggest following another recipe or atleast doubling the amount of chocolate if you use semi-sweet.

One Bowl Brownies from Smitten Kitchen
Look at that gorgeously thick batter!


One Bowl Chocolate Brownies
Recipe from Smitten Kitchen

3 ounces [85 g] unsweetened chocolate, roughly chopped
1 stick [113 g / 4 oz] unsalted butter - I used salted and omitted the salt
1 1/3 cups [290 g] castor sugar
2 large eggs
1 tsp vanilla extract
1/4 tsp table salt
2/3 cup [90 g] all-purpose flour

Instructions -
  1. Preheat oven to 350 F [180 C]. Line a 8x8 pan with parchment or foil, allowing some to extend over the sides to aid removal post baking
  2. In a large pan, over a bain marie or in the microwave, melt together the chopped chocolate and butter.
  3. Remove from heat and mix in the sugar. Add the egss, and then the vanilla extract.
  4. Sift together the salt and flour into the mixture. Pour into prepared pan and bake for 20-25 minutes, until a wooden skewer inserted comes out clean.
  5. Enjoy with some ice cream on the side.

Monday, August 20, 2012

Chocolate S'more Thumbprints

Chocolate S'more Thumbprints

Who saw the finale of Masterchef All Stars yesterday? I won't post any spoilers, but I was so so excited, that person is my absolute favorite, and my reason to watch the entire season! Technically, I shouldn't even be watching, since I'm approaching the deadline for my dissertation, and am hard at work, not leaving home for days sometimes. My laundry stack consists of only pyjamas and shorts -_-   Fun times, right? Hopefully though, this is my last post while working on the dissertation, I should be done by the next one. Then I'll finally have time to make the rounds of the blogosphere, something I've missed a lot.

So today's post is for this month's Secret Recipe Club, and I got Melissa's Cuisine as my assignment. This was one of my better assignments, I had a ton of options, and would probably have made a few more things if I wasn't so busy, especially the one recipe that's been doing rounds of the blogosphere, and one that I'll probably be making very soon.

But I chose these thumbprints for now, mainly because I was in the mood for something sweet and indulgent. I had to make the marshmallow fluff from scratch since I haven't seen it in stores here, and it was a lot of fun making it too. I'll post about it sometime, after perfecting the recipe.

These cookies are crumbly, chocolate-y but not too much, and the frosting on top gives a fantastic contrast. Plus, they're just so much fun to look at.

Chocolate S'more Thumbprints
From How Sweet Eats via Melissa's Cuisine
Yield : About 2 dozen

For the cookies -
1/2 cup [113 g / 1 stick] butter, at room temperature
1/4 cup [40 g] brown sugar
2 tbsp [44 g] sugar
1 tsp vanilla
1 egg yolk
3/4 cup [90 g] flour
1/4 cup [22 g] cocoa powder
1/4 tsp salt
1/2 cup mini chocolate chips
1 batch marshmallow frosting [recipe below]
Graham cracker crumbs, of about 2 crackers

Instructions -
  1. Preheat oven to 375 F [190 C]. Grease and line two cookie sheets.
  2. In a large bowl, cream together the butter and sugars, till light and fluffy. Add in the vanilla and yolk and beat till well incorporated.
  3. In a medium bowl, sift together the flour, cocoa powder and salt. Now add this to the butter mixture, and mix just until incorporated.
  4. Fold in the chocolate chips. Put about inch sized balls onto the cookie sheet, and make an indentation in the centres using your thumb.
  5. Cook for 8-10 minutes, till the outsides seem firm. Cool on a wire rack till you prepare the frosting.
For the marshmallow frosting -
Recipe from How Sweet Eats

1 cup [226 g / 2 sticks] butter, at room temperature
1 tbsp vanilla extract
1 1/2 cups marshmallow fluff
3 cups powdered sugar, sifted

Instructions -
  1.  In the bowl of your mixer, beat the butter till it's creamy [about 5 minutes].
  2.  Add the vanilla and fluffy, and beat for another 3-4 minutes, till light and fluffy. Now add 2 1/2 cups of the powdered sugar and beat well. Add the remaining 1/2 cup in small additions, till it reaches desired consistency. 
  3. Using a tablespoon, or a piping bag if you wish, put a dollop on the cooled cookies. 
  4. Sprinkle on the graham cracker crumbs, and serve.

Wednesday, August 1, 2012

Chocolate Oreo Cake.. Apologies for a long hiatus

Chocolate Oreo Cake

So. A new post on this blog. After almost a month and a half, that's quite shameful. But, this is what I'd been doing for a month, immediately after my last post.


I traveled to all those places, and then headed back to Warwick for my final week there. Because of a number of reasons, I decided to head home to do my dissertation (a 15,000 word essay), and leave a month earlier than most everyone. It's a whole other matter that those reasons aren't too valid right  now, but hey, I'm home now, so what can I do. I was busy packing and saying my goodbyes, and I've been home for a week now, unpacking and saying hellos. It's only now that I've got some breathing time to actually write up a post. All you guys that are reading this and have stuck by me, I really, genuinely, thank you. I promise, none of that anymore.

Chocolate Oreo Cake

And all you guys that left? I've got a great cake to try and win you back. Is a Chocolate Oreo Cake good enough? It should be, because this cake was amazing. Even more fun, just attacking the entire thing with some forks. There has never been a better feeling.

Chocolate Oreo Cake
Look at that dreamy filling

Chocolate Oreo Cake
Avanika original - Individual components linked.

For the cake -
I used the recipe for this cake, from Chocolate Cakes. It's fast becoming my favorite, flavorful, yet sturdy enough to be torted and lifted and moved about {I'm quite rough with my cakes}. Make 1 batch of the recipe, and torte each cake it into 2 layers after it's cool.

For the filling -
1/2 cup whipping cream
2 tsp powdered sugar
About 20 oreos, cut into quarters

Instructions -
  1. Whip the cream and the sugar together until fluffy. Gently fold in the pieces of Oreos. 

 For the frosting -
Again, I used the recipe from the cake I linked to, it's super easy, and one I use when I need something lighter and not sinfully rich. Follow the instructions to make one batch of the frosting.

Assemble -
  1.  Stack the first torted layer, flat side down on your cake board. Scoop on a 1/3rd of the filling.
  2. Now add the second layer, pressing down slightly. Scoop on another third of the filling. 
  3. Repeat for third layer, and then add on the fourth, making sure the top of the cake has the bottom flat surface of a torted cake, so that it's completely straight and easy to frost.
  4. Add a thin layer of the frosting - a crumb coat - and allow to chill for a few minutes in the fridge. Now add on the final layer, and decorate as desired. I like keeping it simple, to give off a homemade cake feel. Cut and serve :)

Monday, May 21, 2012

Chocolate Cookie Dough Cheesecake Bars

IMG_2863 2

I am just writing this post after submitting the last assignment of my life. I do have a dissertation due, but this is the last assignment ever. I'm pretty saturated with all the writing, so I'm going to keep this one short.

I was assigned Dancing Veggies blog, and had a lot of great options, but picked these bars, but forgot a step where I had to add the chips into the cookie layer. I made up for it by putting a chocolate layer on top, and these tasted amazing. I've changed up the proportions a bit, because I feel they need more of the cheesecake taste.

Chocolate Cookie Dough Cheesecake Bars
Inspired by Dancing Veggies

1 cup [120 g] flour
1/4 tsp salt
1/2 tsp baking soda
1 stick [113 g / 8 oz] butter
1/3 cup white sugar
1/4 cup brown sugar
1 egg
1 cup chocolate chips - or alternately, you can add a chocolate layer like I did, following this recipe
For the cheesecake layer.
16 oz cream cheese
4 tbsp white sugar
1 egg
1 tsp vanilla

Instructions -
  1. Preheat oven to 350 F (180 C). Grease and line a 9x9 pan, with overhang
  2. In a large bowl, sift together the flour, salt and baking soda.
  3. In another bowl, cream together the butter and sugars until light and fluffy. Now beat in the egg and mix well.
  4. Add the flours to the butter mixture, and mix until just incorporated. Fold in the chocolate chips, if using. Lay this onto the pan.
  5. In a clean bowl, cream together the cream cheese, sugar, egg and vanilla. Pour onto the cookie dough layer. Bake for 25 minutes, until the center is a little jiggly and the sides are set. 
  6. Cool, and if using a chocolate layer, pour on top. Cut into squares and serve.

Monday, April 23, 2012

Chocolate Caramel Shortbread... Homemade Twix

 Chocolate Caramel Shortbread / Homemade Twix

These bars! I've been waiting so so long to be able to post. For once, I made my Secret Recipe Club assignment almost as soon as I got it. Turns out, this isn't always the best idea, since I had to wait almost a month, and these bars were so good, it was like slow torture. They rank high up, in my top 10 recipes for sure. They had the perfect slightly crunchy crispy shortbread base, exactly like a Twix base, but more substantial, with more win in it. The caramel is a modified dulce de leche, just with extra butter and extra goodness. It was the perfect goeey, stringy soft caramel that I love. And ofcourse, the chocolate layer. I used good quality dark chocolate, and that just took the bars to a whole other level.

This recipe is one of the easiest I've made, but also is one of the best. I can't stop raving, I made the mistake of making only half a recipe, since I didn't have a big enough pan. I'm just waiting to go buy a nice big pan now so I can make a full recipe. Don't make the same mistake I did.

Chocolate Caramel Shortbread / Homemade Twix

I got Sara's blog, which has probably given me the most options to pick from ever. Since I now cook, there were a few cooking recipes that I bookmarked too, but since I want to keep the blog only about baking, I picked this. Sara chose to decorate it with some colored white chocolate, and while I considered that, for me, nothing looks better than a nice smear of dark chocolate.

Chocolate Caramel Shortbread / Homemade Twix
I always leave nice overhang so that removing and cutting becomes easy. I sometimes lay two strips of foil out in a cross pattern if the foil won't cover the pan entirely.

Chocolate Caramel Shortbread / Homemade Twix
The shortbread, nice and golden brown-y, will make your house smell amazing!

Chocolate Caramel Shortbread / Homemade Twix
One of the best things in this world!

IMG_2296 - 2
Your finger should leave a dent like shown in this picture. This is post cooling, so it aim for a little runnier.

Chocolate Caramel Shortbreads / Homemade Twix
Recipe adapted from Cook with Sara

Shortbread Crust -
1 cup [2 sticks / 226 g] butter, softened
1/2 cup powdered sugar
1 tsp. vanilla
2 cups [240 g] flour
3/4 tsp. salt

Caramel Filling -
7 Tbsp. [100 g] butter
1/3 cup brown sugar
2 cans (14 oz each) sweetened condensed milk
Pinch of salt

10 oz. dark [or semi-sweet] chocolate, chopped
3 tbsp [ 42 g] butter

Instructions - 
  1. Preheat oven to 350 F [180 C]. Grease and line a 9x13 pan with parchment, leaving some overhang on the sides.
  2. In a large bowl, beat together the butter and sugar until light and fluffy, about 2 minutes. Now add in the vanilla, the flour and the salt. Mix until just combined.
  3. Pour into prepared pan, and pat the crumbs down lightly, to make sure they stick. Bake for around 15 minutes, until golden brown around the edges. Remove to cool completely.
  4. For the caramel filling - In a large saucepan, combine together the butter, brown sugar, sweetened condensed milk and salt. Bring to a boil, constantly stirring. Reduce heat to medium low, stirring constantly and simmer until it turns a deep caramel color, about 15 - 18 minutes. Pour onto cooled crust, and refrigerate for an hour. It might seem runny at first, but the refrigeration makes it firm up a bit. Post refrigeration, your finger should make and leave a dent, as shown.
  5. Once the caramel layer is ready, melt the chocolate and butter together. Pour onto the caramel layer, just making lines with the spatula if you want, and refrigerate for another hour.
  6. Cut into bars, [I prefer using a pastry scraper], and serve.


Monday, March 19, 2012

Chocolate Fondant / Chocolate Lava Cake / Molten Chocolate Cake

IMG_2282 (2)

Doesn't that look amazing? This is the elusive {or fussy} cake that goes by too many names. What do you call it? I prefer Molten Chocolate Cake. Anyway, I got Heidi's blog as my assignment this month, which had so so many recipes, that the choice became qutie difficult. Now that I've began cooking, a lot of her savory recipes seemed interesting too, but in an effort to keep this blog all about the good stuff, I decided to stick with a dessert recipe. Since her blog is translated to English, I chose one of the easier recipes, I didn't want to lost in translation. And this satisfies a craving too.

Managing the Facebook page for the Secret Recipe Club has made me quite active about it, so there's no chance anymore of me missing a post, which, with the new stricter rules, is a good thing. Go on and like the page, and while you're at it, like the page for this blog too :)


Molten Chocolate Cake
Recipe from Tasty Kitchen via Heidi's World

100 g dark chocolate {I used 64%}
1 stick [113 g / 8 oz] unsalted butter
2 tsp [30 g] cocoa powder
2/3 cup icing sugar
2 eggs
2 egg yolks
6 tbsp flour

Instructions -
  1. Preheat oven to 425 F [220 C]. Grease and line ramekins with castor sugar, optional, but it helps.
  2. In a double boiler, melt together the chocolate, butter and cocoa. Remove from heat, and sift in the icing sugar.
  3. Now add the eggs and the yolks, mixing well between additions. Sift in the flour, until just mixed, being careful not to overbeat.
  4. Pour into prepared ramekins and bake 13-15 minutes, till sides are set but the centre is still jiggly. You might want to have one test run first, since the timing is crucial for this sort of cake.
  5. Serve with ice cream, whipped cream, or a dusting of icing sugar.

Related Posts with Thumbnails